Chocolate Cookie Factory
See the how to video on how to make this chocolate factory here:
This template was originally found in a 2003 Better Homes and Gardens magazine called "Christmas Cookies". I don't normally upload copyrighted images but this templates in not available anywhere (for purchase or for free) as far as I know.
Right click on the template below, select "Save image as" and save it to your computer.
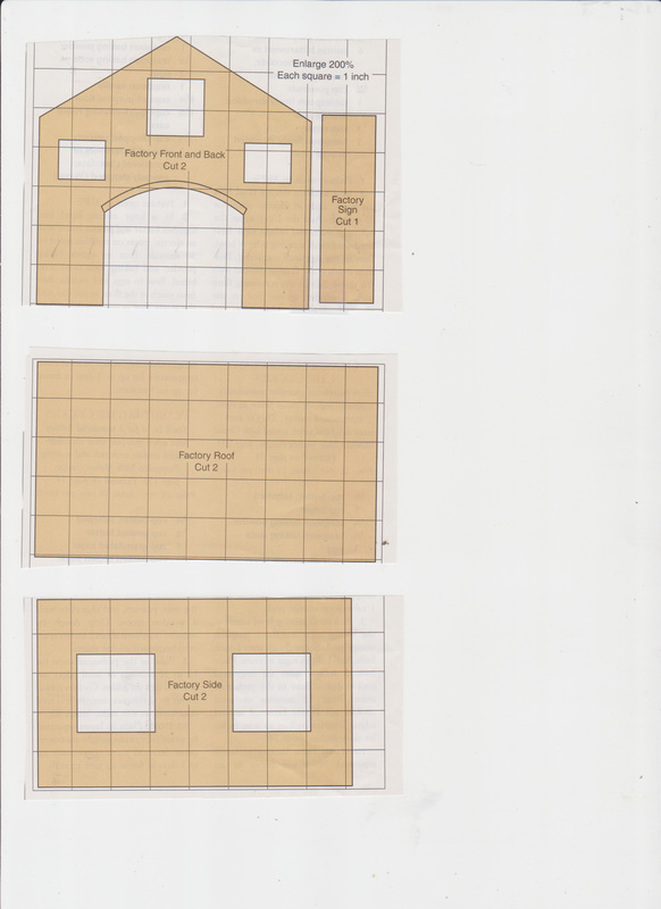
Print it out on a standard 8.5 x 11" piece of printer paper. Then cut out the pieces and enlarge each one 200%
*** NOTE****
When I printed out the scanned image from this website to see if it was okay, I noticed that this image is just a little bit smaller than the original. You may have to enlarge each piece by approx. 204-205% to get the squares to by one inch by one inch.
Print This Page
Cookie factory directions and and ingredients
To make this you will need:
Chocolate Dough:
3 ½ cups all purpose flour
½ cup unsweetened cocoa powder
1 tsp baking powder
1 tsp ground cinnamon
¼ tsp salt
1 cup butter
1 cup sugar
⅔ cups light or dark corn syrup (I used dark, but it won’t make too much difference either way)
1 tbsp vanilla
1 egg beaten
To make the dough:
Combine the flour, cocoa powder, baking powder, salt and cinnamon in a medium sized bowl and set aside.
In a medium sized saucepan over medium heat, combine the corn syrup, white sugar and butter. Stir until butter is melted and the sugar dissolves (about 3 minutes or so, the sugar will never completely dissolve, just stir until most of the sugar seems dissolved).
Remove from heat and pour into a large bow. Allow to cool to almost room temperature. Stir in vanilla and egg.
Stir in the dry ingredients a little at a time until combined.
The dough will appear to be a sticky mess! Do not despair! Wrap in plastic and refrigerate until firm (about an hour).
Chocolate Royal frosting:
½ cup meringue powder
2 ½ oz warm water
3 to 3 ¾ cup powdered sugar
¼ unsweetened cocoa powder
Blend the meringue powder and the water on low speed until powder is dissolved. Increase speed to high and beat until you get soft peaks. Blend in the cocoa powder. Blend in enough powdered sugar to get a texture that can be piped but that is not runny.
Store all unused portions in a covered container or cover with damp cloth or plastic wrap. No need to refrigerate.
Windows:
25 large (jolly rancher sized) candies
Arrange candies on a foil lined or silicone mat lined cookie sheet. Leave about ¼ “ between them. Bake at 300F for about 5-10 minutes until they are melted. Watch them carefully, when they get too hot they start to bubble and may darken.
Remove from oven and cool about 5 minutes until the candy is dry to the touch but still soft.
Score the candy with a large sharp knife to make window pieces.
Cool completely, break candy along score lines.
Conveyor Belt:
2 packages Hubba Bubba ribbon gum tape
8 Swiss rolls or similar chocolate cakes/candies that are roll shaped.
10 (or more) plain cookies
Candy sprinkles
See video instructions for assembly.
Cart:
2 hershey’s chocolate bars
chocolate malt balls or similar small chocolate ball candies
White chocolate or candy melts ( 1-2 oz)
See video instructions for assembly
Other:
red frosting
chocolate chips
candy canes (for decorating)
Chocolate candy melts (about a pound and a half) I used light and dark for the roof, so at least 1 ½ pounds of the light for the roof and another 25-20 dark candy melts.
Candies (like M&Ms for) decorating
Chocolate pretzels
Print out template and enlarge on your printer/scanner so that the small squares in the template are 1 inch x 1 inch. I enlarged the template from the magazine by 200% on my printer. You may have to adjust the percentage of enlargement on your printer to get the right size.
Cut out Cookie pieces:
Once the dough is cooled and workable, roll out half of it between sheets of parchment paper. If the dough is too still, just allow it to warm at room temperature for a few minutes. It is a balancing act with this dough to keep it a the perfect temp.
For the roof pieces, roll out the dough to an ⅛ th of an inch.
Spray your template with cooking spray and place it on the rolled out dough.
Cut out two roof pieces.
Transfer to cookie sheet on parchment or onto a silicone mat as shown in the video.
All other pieces should be cut out of dough that is ¼” thick.
Cut out two end pieces and two side pieces.
Cut out one sign piece.
Cut out 8 shutter pieces. These should be rectangles that are ¾” x 2 ¾ “ (these are approximate measurements, a bit more or less would be okay. Just make sure you can fit two to them side by side between the windows on the side pieces).
Baking the pieces.
Bake all pieces at 375 F for 10-12 minutes until firm. I used an insulated cookie sheet and a silicone mat that increases my cooking time to almost 15-18 minutes.
Remove baked pieces and immediately put the paper template back on and trim excess cookie with a sharp knife. Do this while they are hot otherwise the pieces may crack.
After trimming put the pieces back in the oven for an additional 2-3 minutes. Once again, because of my cookies sheet and mat, I let mine bake for an additional 5-7 minutes. You need to bake them until they are dry. I baked mine until they were a darker brown on the edges, make sure you don’t burn them. Don’t underbake or the cookie pieces will be too bendy and may break during assembly.
Allow pieces to cool completely.
Prepare royal frosting
Pipe frosting around windows (on wrong side) and attach windows.
Allot frosting to set.
Turn pieces over and attach shutters and outline windows with frosting.
Decorate further as desired.
Allow all pieces to dry completely (about 2 hours).
Assemble the front/back and side pieces using royal frosting. Use soup cans to help you hold the pieces up. Add more frosting to inside corners to reinforce. I did this on a cookie sheet so you can move it to a convenient location for drying.
All to set for at least an hour.
Pipe frosting along the top edges of pieces and attach roof pieces.
ALLOW TO DRY FOR AT LEAST 8 HOURS BEFORE FURTHER DECORATING OR PICKING UP THE HOUSE.
Spread chocolate on the roof sign piece, allow to harden and then melt some white chocolate. Place in a ziplock bag, cut a tiny bit of the corner off and write out “Chocolate Cookie Factory” on one side of the sign. Allow to harden and write the same thing on the other side.
Spread some melted chocolate on the bottom edge of the roof and attach regular and dark chocolate candy melts in a random pattern. Spread more chocolate above that row and attach the next, offsetting the “tiles” and so that they overlap slightly the row beneath. You may have to cut an occasional “tile” in half with scissors or a knife.
Continue to top of roof and do the other side.
Attach the roof sign and chocolate pretzels with melted chocolate.
Assemble the conveyor belt on a cake board or cookies sheet. Place house on top of conveyor belt and mark off corner of house.
Place dabs of frosting on the marks and then replace the house on the frosting.
Remove excess.
Glue the plain and decorated cookies and the cart to the cake board using chocolate.
Glue the cookies to the conveyor belt with melted chocolate.
Add whatever other kind so decorations you want!
All photos below are copyrighted 2015 by Yoyomax12 Video Productions Inc.
